NEXPETHigh Quality PET Preforms for Bottles and Jars
STRETCH BLOW MOULDING PET BOTTLES
This process involves the production of hollow objects, such as bottles, having biaxial molecular orientation. Biaxial orientation provides enhanced physical properties, clarity, and gas barrier properties, which are all important in products such as bottles for carbonated beverages.
There are two distinct stretch blow molding techniques. In the one-stage process, preforms are injection molded, conditioned to the proper temperature, and blown into containers—all in one continuous process.
In the two-stage process, preforms are injection molded, stored for a short period of time (typically 1 to 4 days), and blown into containers using a reheat-blow (RHB) machine.
There are two major reasons for stretching PET. The first is purely economic. Stretching allows thinner, more uniform sidewalls and thus less expensive containers. Second, with the stretching comes orientation and a dramatic improvement in physical and barrier properties. Orientation is a physical alignment of the polymer chains in a regular configuration.
A typical stretching sequence for PET is shown in Figure 1. As force is applied to the material, there is a region where very little stretching occurs (A). Here PET behaves somewhat like an elastic material: if it is stretched only a small amount and released, it will shrink back to its original size. If stretching continues past the yield point (B), however, the material will start to stretch and become thinner, causing permanent deformation. This is followed by a region of continued stretching, where the amount of force remains constant (C). Once the material has been stretched past its natural stretch ratio (NSR) (D), a dramatic increase in force is required for additional stretching to occur. This is known as the strain-hardening region (E). It is here that the highly desired increases in physical properties are maximized. Therefore, it is critical that the natural stretch ratio be surpassed slightly during the stretching process.
Figure 1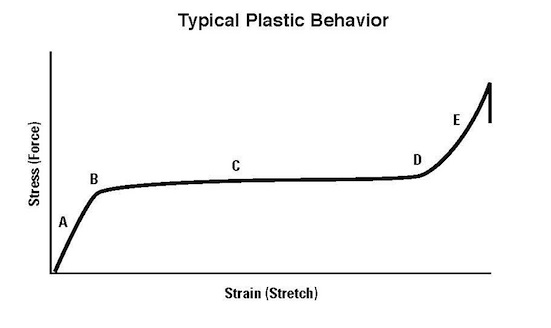
REHEAT TEMPERATURE
The temperature of the preform during the reheat blow molding process can be controlled by adjusting settings at various points in the reheat blow machine. Typically, temperature changes should be made in small increments; allow at least 5 minutes for the machine to equilibrate before assessing the effect of the change. It is also important that the temperature of the preforms being fed into the reheat blow machine be relatively constant. Preforms that are colder than the machine is set up for will tend to yield bottles that are pearlescent; preforms that are hotter than the machine is set up for will tend to yield bottles that are hazy. To eliminate the need to adjust the temperature of the machine to compensate for varying preform temperatures, maintain a constant preform storage temperature. In cases where preforms have been stored in unusually cold or hot conditions, allow the temperature of the preforms to reach the normal preform temperature before feeding them into the machine.
PREFORM DESIGN
One of the most critical aspects of producing high-quality PET bottles is the design of the preform.
1. Empirical data, obtained through experiments, on how much a specific PET must be stretched to reach its natural stretch ratio. Since a preform is stretched in both hoop (diameter) and axial (length) directions, data for both are needed. These are called the hoop stretch ratio (HSR) and the axial stretch ratio (ASR).
2. Drawing of the bottle with all dimensions, including wall thicknesses.
3. Desired bottle weight.
Preform design should be such that the following parameters are maintained-
Hoop Stretch Ratio (HSR) => bottle diameter/ average preform diameter (OD+ID/ 2) = 4.0 to 5.0
Axial Stretch Ratio (ASR) => bottle body length/ preform body length (not including un-stretched neck) = 2.5 to 3.0
Planar Stretch (PSR) => HSR x ASR = 10 to 15
Balance => HSR/ ASR = 1.6
BLOWING/STRETCHING BEHAVIOR OF PET BOTTLES
When blowing bottles, it is critical to start with a correctly designed preform to acquire the desired physical properties. The preform design should ideally be based on the dimensions of the finished bottle and the stretching characteristics of the specific PET grade to be used. For the following discussion on the stretching/blowing behavior of PET bottles, we will assume that the preform is well designed and that it has been properly heated and conditioned. In the stretch blow molding process, the preform is placed inside the blow mold and pre-blow (low pressure) air is introduced. As pressure starts to build within the preform, there is very little initial expansion (Figure 2A). An aneurysm starts to form in the middle of the preform (Figure 2B) and continues to get larger until a pre-bottle is formed. Note that the pre-bottle is slightly smaller than the mold cavity (Figure 2C). At this point, high pressure blow air is used to finish blowing the pre-bottle out against the inside wall of the mold (Figure 2D). As previously indicated, it is essential that the design and preform temperature be correct for this to occur. Note that the strain-hardening region corresponds to the final phase of the bottle-blowing process depicted in Figure 2D. Achieving this degree of orientation is extremely important when trying to obtain optimum physical properties in the bottle. Since it is impossible to see the bottle being blown inside the mold, how does one know if the pre-bottle is being formed and the PET is being strain-hardened? The answer lies in the uniformity of the material distribution in the oriented portions of the finished bottle. When blown correctly, the bottle should have a wall thickness that is relatively uniform starting at about the middle of the shoulder and going down the entire sidewall to a point about midway around the base. If the pre-bottle is not formed, the center section of the sidewall will be much thinner than areas toward the base and shoulder region of the bottle.
Figure 2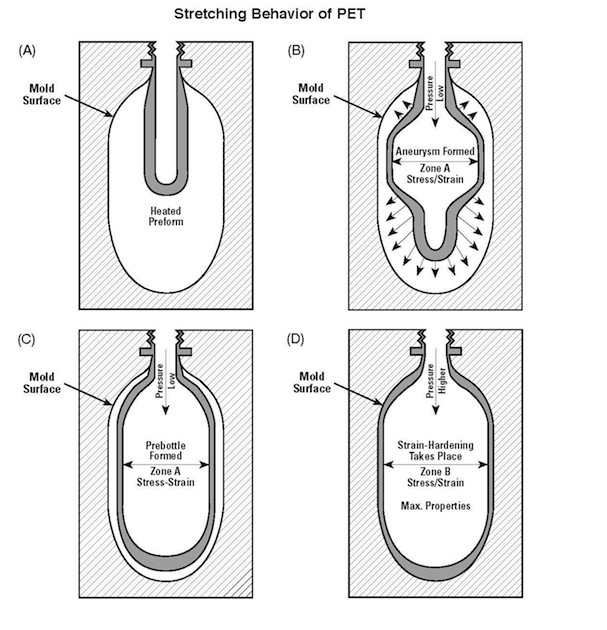
There are a number of variables that can prevent
the formation of the proper pre-bottle, as illustrated
in Figure 9. These include:
• Preform IV is too low due to improper drying.
• Preform IV is too low due to the use of too much regrind.
• Preform temperature is too high.
• Preform moisture level is too high.
• Preform not properly designed for the material being used.
Figure 3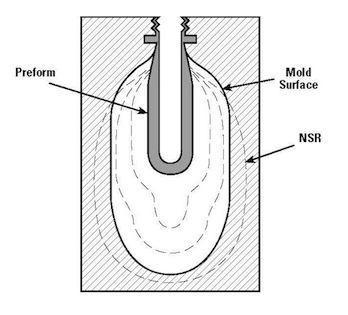
If the conditions shown in Figure 3 prevail, the material cannot be stretched sufficiently to attain its NSR and the degree of stretching needed to reach the NSR lies outside the mold. In other words, if the preform were blown without the mold being there, the pre-bottle would be larger than the mold cavity. Therefore, when the preform is blown, the surface of the mold stops the expansion of the preform before the NSR and pre-bottle are achieved. This results in bottles having thin sidewalls and thick shoulders or bases.
As might be expected, these variables can also cause the pre-bottle to be formed too soon, as illustrated in Figure 4. Factors that could cause this include:
• Preform IV. too high because the incorrect PET formula is being used.
• Preform not hot enough.
• Improperly designed preform for the material being used, such as going from a copolymer to a homo-polymer of the same IV.
Figure 4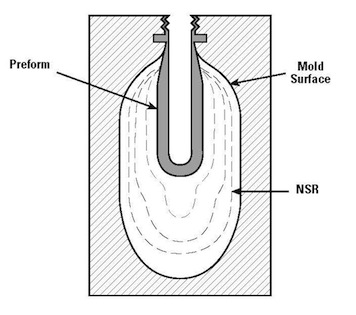
If the point at which the pre-bottle occurs is well within the confines of the mold as shown in Figure 4, the PET will have to be stretched too far beyond its NSR. This excessive stretching causes micro-fracturing of the PET, which results in what is known as pearlescence.
PREFORM PEARLESCENCE AND HAZE
Pearlescence and haze are both aesthetic defects that reduce the clarity of a bottle. While both have the same general hazy appearance, the cause for each is entirely different. When a clear preform becomes hazy in the RHB process, it is because the preform was too hot and started to crystallize. In the vast majority of cases, crystalline haze is due to low IV. This is because the crystallization rate of PET increases as the IV decreases. Since a preform is heated from the outside, haze occurs on the outside surface. Pearlescence, on the other hand, occurs on the inside surface. It is due to two factors. First, the inside surface of the preform must stretch more than the outside surface of the bottle. Secondly, the inside surface of the preform is the coolest part of the preform and therefore does not stretch as easily as the warmer areas toward the outside. The combination of both factors causes the PET to stretch much too far into the strainhardening region (see Figure 3), producing thousands of very tiny cracks. These microfractures affect the passage of light and cause a somewhat hazy appearance. Pearlescence can be distinguished from crystalline haze by its luminous sheen that is similar to that of an oyster pearl. When the preform IV is correct, it is relatively easy to find an RHB temperature setting that will heat the inside surface enough to avoid pearlescence but not so hot that the outside becomes hazy. If the preform IV gets too low, however, it may become impossible to make clear bottles. In these cases, increasing the temperature to eliminate pearlescence will make the haze worse, whereas decreasing it to eliminate haze will make the pearlescence worse.
ESTABLISHING OPTIMUM REHEAT–BLOW CONDITIONS
To produce a uniform bottle sidewall thickness, RHB conditions must be properly adjusted. A suggested procedure for establishing optimum conditions:
1. The stretch rod should be used only to center the gate of the preform in the bottom of the bottle; do not use it to obtain orientation. If the speed of the rod can be adjusted, reduce it to the point where the gate moves off center. Then increase the speed in very small increments until the gate is again centered. Hold that speed setting.
2. Increase the line speed until a slight pearlescence appears. Then adjust individual heater temperatures to make the pearlescence uniform. Clear areas indicate the preform is hotter in that location; temperature in these areas should be reduced. Once the pearlescence is uniform, decrease the line speed to its normal setting.
3. If the machine is normally run at its maximum speed, a different approach will be required. Reduce the temperatures of the heaters until a slight pearlescence appears; then adjust the individual heaters to make the pearlescence uniform. Once it is uniform, record the settings. Then increase the temperature of each by the same relative amount. For instance, if one heater is set at 80 and another at 40, and an increase of 5% is desired, increase them to 84 and 42 respectively. By doing this in small increments, the pearlescence should disappear in a uniform manner.
4. If the bottle sidewall thickness is not uniform, increase the preblow pressure and check the uniformity again. If this makes the sidewall less uniform, decrease the preblow pressure.
5. Once optimum preblow pressure is established, further improvements can sometimes be made by adjusting the timing of the preblow relative to the timing of the stretch rod. Therefore, change the preblow timing so that it starts sooner, as well as later, in the sequence and assess the results to determine which timing is best.
NOTE: The preblow pressure and the time can have a great effect on the thickness of the shoulder and base of the bottle. An increase in both will usually increase base thickness, while a decrease in both will typically increase shoulder thickness.
6. If no noticeable change in the uniformity can be made by changing the preblow pressure and its timing, increase the high pressure blow delay time. The high pressure may be coming on too soon, and thus not giving the preblow time to do its job.
7. If changes in the high pressure delay do not give the desired thickness uniformity, try increasing the stretch rod speed in small increments.
8. As a last resort, change the heater profile. When adjusting the machine, never change more than one variable at a time. If two variables are changed simultaneously, one change might improve the sidewall uniformity while the other might make it worse, with the net result being no change. This could lead to an incorrect conclusion that neither of the two changes had an effect.
BOTTLE SHRINKAGE AND CREEP
After a bottle is blown, it will shrink as the internal stresses relax. While most of the shrinkage occurs immediately after blowing, the bottle will continue to get smaller for several days. The reverse of this occurs when the bottle is filled with carbonated soft drink; the high pressure [typically 0.41 MPa (60 psig)] will cause the bottle to “creep” or expand. It is important that the degree of shrinkage and creep be controlled since most bottlers have strict specifications on the maximum limits for each. Reheat-blow conditions have a great effect on shrinkage and creep. Bottles blown from preforms that were heated to a temperature just slightly above the pearlescent point [approximately 95°C(205°F)] will shrink the most but will have the best resistance to creep. The opposite is true of bottles made from preforms that were heated to a higher temperature, just slightly below the haze point [approximately 105°C (220°F)]; these bottles will shrink less but creep more. While preform temperature generally has the greatest effect on the level of bottle shrinkage, it is important to note that the temperature of the blow mold will also have an effect. The warmer the mold, the greater the shrinkage. This is because a warm mold tends to promote relaxation of internal stress. For the same reason, bottles stored in a warehouse will shrink more during the hotter months.
SUMMARY
The basic principles involved in blowing (stretching, orienting) PET bottles are fairly simple, but the actual mechanics of the operation can be complex. The quality of the preform and its heat profile just prior to blowing are major factors. It is also important that preform design and material IV be properly matched for a given container.